There are loads of people way better and more knowledgable than me on this but as a youth worker who likes creating stuff on a low budget, I thought it might be good to show how I do it.
Filming
I use a Sony Handycam. Not brilliant by today's standards but it's 1080p (high definition) and really easy to use. We've had it for yonks so they're probably pretty cheap second hand now.
The biggest weakness for me is that it's autofocus and you can't switch to manual focus (so no soft focus backgrounds). Although the newer ones may well have manual focus, I don't know.
Stick it on a tripod and you're off.
Mics
Well worth using any time you're filming people talking. I use a Tascam one with lapel mics that plug into it so people can wear the mic, thread the lead through their clothes and then pocket the Tascam.
I got 2 for £40 each so I can have 2 people onscreen at once. There's lots of tutorial vids online about how to muck about with the settings for those (like me) who don't really know. After some practice, you'll be fine and get strong signal but without any distortion etc.
Always leave the fluffy bits on the mics. Outside it stops light winds being a problem and inside it stops pop happening when people say their 'P's. Think about acoustics inside too. If you clap your hands and it bounces around like you're in a swimming pool, you probably want a different room. Carpet and curtains if you can. :)
The results are always much better with mics than without.
Lighting
This always matters. If you're outside, the sun can be helpful but also difficult. Don't film a person with the sun behind them. They'll come out all dark. But you don't want the sun in their face either - too dazzling. Play around with positioning till you're happy.
If you're inside, try to block out all natural light and use artificial lighting only. This is because the sun moves around and so do clouds and it creates variations in what you end up filming. Very rarely I'll use the sun coming in when it's from behind camera and it's a cloudless sunny day and what I'm filming is short (so it won't be affected as the sun moves). But 9 times out of 10 I'll block it out and use lamps.
I got all my proper photography lights, umbrellas and stands from my amazing neighbour next door who just gave them all to me for free! But if you don't have a neighbour like that, you can do what I used to do all the time - play around with desk lamps (the halogen ones are good) and room lights till you're happy! I've used all sorts - even my front bike light bouncing off a bit of white card - and that worked really well!
For filming people talking, I try and use a clean white wall in the background and sometimes with the room lights on (if they're bright), this will be enough but usually I'll use a lamp 45 degrees on each side of them at head height to light their face. Look for shadows. Positioning the lights wrongly, or only using one side, can create annoying nose shadows on the face or big shadows on the wall behind. Even with 2 lights well placed, you may still have shadow on the wall behind and you can use another little lamp to uplight the wall to reduce this if you like.
Again, like using mics, good lighting (or at least thinking about where the light sources are and using them to your advantage) makes a big difference to the end result.
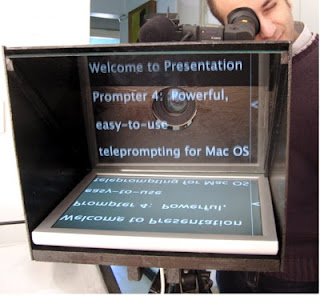
DIY autocue
 If you're filming people talking or teaching (like I do most of the time) and you want to say a lot but limit the waffle, it's definitely worth reading to camera. It's a skill that takes a little practice but for good speakers who are good readers, it works really well and being able to do this is a lot more common than the amazing skill (I wish I had it) of brilliant efficient speaking! It depends on the person though and sometimes it's more natural to ditch autocue so they can be more natural. But if there's a LOT to say, it's worth persevering with the cue!
So I thought autocue would be expensive and it definitely is if you buy them! But you can make them at home for free too! I watched a video like this one and then knocked something up in an afternoon and have used it ever since.
Angles
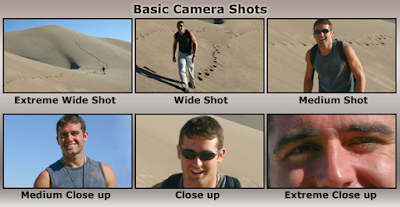
 It's always good to have a couple of good takes of everything so you have options when you're editing. And when you're filming a person talking it's good to have a 'wide' and a 'close' shot. If you're taking your time and producing something that needs to look proper, then I'd get 2 good takes of both angles (so 4 total).
But if you're doing things quick like I often am, I'll sometimes just get 1 good take on the wide angle and then 'punch in' (crop the shot) in the edit to get a close angle and this will mean I can skip mistakes the person made in the take. This also saves time when it comes to editing. No trawling through lots of takes. But the downside of punching in is that you lose resolution so it depends if this matters much for your project. Adding quality/saving time is always a question.
Editing
 There's TONS to get into here but I'll keep it simple and just say what I do. I use a Macbook, iMovie (for editing the video), Garageband (for editing sound) and Powerpoint (for creating cutaway screens and graphics) and love it because it's all quite simple. And usually the stuff I'm shooting has decent powerpoints to go with it already, so the cutaways are pretty much ready to go.
1. Sound editing and syncing
First thing I do is drag the sound files from the mics into Garageband and use presets in there (like 'narrator') to master the track. I'll make sure there's no reverb or echo (annoying when it automatically adds those) and I'll make sure there's compression on it. Compression evens out the volume a bit and everything sounds louder. Export the sound files to sync up with your video takes in iMovie.
Once your sound files are in your iMovie project you can hit the little magic wand and it'll improve the sound file again (adding more compression and lifting the volume). I usually do this.
Sync up the sound files with your video takes (by looking at the wave images underneath - not just by ear) and then mute the video footage so it all sounds great. You might want to export the sync files so you can bring them back into iMovie to edit the project without constantly needing to sync little bits all the time (definitely worth it if you're using lots of takes).
Garageband is also useful for making bits of music for your project but if you need an easier (and usually better) solution you could find a royalty free music site such as www.bensound.com. He's great. :)
2. Editing the video
iMovie makes this pretty simple. Once you've got synced files with great audio you can crack on and edit your project.
I use the little magic wand on every video clip in my project so it 'grades' the colours automatically for me. This makes the white wall a bit whiter and does good things with the colours, which is very helpful, especially for me as I'm colourblind!
For title screens and cutaways I find Powerpoint easy peasy to use compared to Photoshop etc (they're much better but I never learned how to use them). Powerpoint can export slides at 1080 so they're great resolution and you have more flexibility in powerpoint than in iMovie to design a great looking title screen or cutaway screen. Export the slides as 1080 jpegs and then drag into your project in iMovie. Done! You can even save individual or grouped elements of your Powerpoint as image files and then add these as 'inscreen images' in your iMovie project so you don't have to rely on iMovie's limited title options.
There's tons more to say about how to edit well but most of it comes with practice and learning to pay attention to details...
- Hit iMovie's 'magic wand' on everything (it usually helps sound and picture)
- Get your sound levels level throughout the project (listen in headphones too)
- Make the cutaways look good (well-designed and high resolution)
- Make the transitions between takes look natural (don't use all the gimmicky iMovie ones)
With some practice, you should do well! :)
Have fun!


